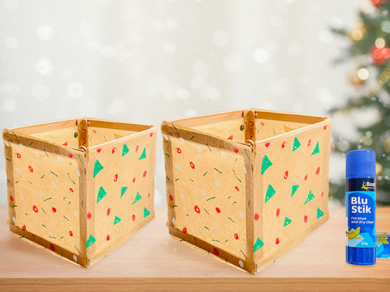
DIY Christmas knick knack box

Welcome to Bostik's DIY Christmas Knick-Knack Box tutorial, where we bring festive joy to your crafting table! This holiday season, add a personal touch to your gift-giving with our step-by-step guide on creating charming knick-knack boxes. Perfect for storing small treasures or presenting special trinkets, our easy-to-follow instructions paired with Bostik's reliable adhesives ensure each box is crafted with care and durability. Let's unwrap the magic of Christmas crafting together—explore our inspiration and make this season merry and bright with Bostik!

Instructions

STEP 1:GETTING READY

Make sure you have everything you need and find a clean surface to work on.

STEP 2: MATERIAL PREPPING

Cut out 4 12cmx12cm baking paper squares. Plug in and turn on your loaded Bostik HG3 Hot Melt Glue Gun.

STEP 3: DECORATING

Using the acrylic markers to decorate the 4 baking paper squares as desired (it doesn't matter which side you decorate). Allow to dry.

STEP 4: FORMING SQUARES

Lay 2 popsicle sticks vertically parallel to each other about 12cm apart. Using your Bostik HG3 Hot Melt Glue Gun glue a pop stick horizontally across the top tips of the vertical popsicle sticks. Repeat for the bottom tips.
 

This should form a pop stick square, repeat to form a total of 4 popsicle sticks squares.

STEP 5: COVERING THE SQUARES

Using your Bostik Eco Stik, glue the decorated baking paper sides down to the sides of the pop stick squares. Make sure you’ve glued the undecorated side down, so the decorated side faces upwards. Cut any excess baking paper that hang off the pop stick square edges.
 

Repeat for the 3 other pop stick squares. 

STEP 6: ATTACHING THE SQUARES

Take 1 pop stick square and glue along 1 side to another pop stick square side using the Bostik HG3 Hot Melt Glue Gun. Repeat this for the other pop stick square. You should now have 2 corners. Allow the glue to dry.

STEP 7: FINAL TOUCHES

Using your HG3 Hot Melt Glue Gun, glue along the side on one corner to the side of the other corner. Glue together the other 2 sides. Allow to dry.

See all products