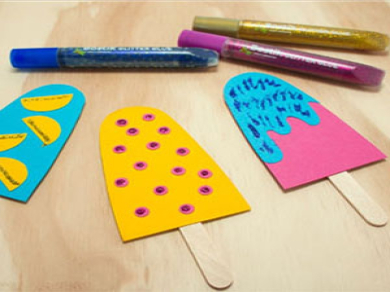
Bostik Icy Pole

Crat your own Bostik-themed popsicle stick! In this tutorial, we’ll walk you through creating a fun and functional craft project using Bostik’s versatile adhesives. Perfect for adding a splash of creativity to your summer treats or as a playful addition to your home décor, this step-by-step guide will help you design and assemble your icy pole with ease. Get ready to chill out and enjoy a cool, personalized project that’s both enjoyable and practical. Let’s dive in and bring a touch of Bostik to your crafting!

Instructions

Step 1

Find a clean surface to work on and make sure you have everything you need.

Step 2

Use the greylead pencil to draw your icy pole on the coloured card. Make it any shape you like and then cut it out. Draw then cut out various shapes from the coloured paper to decorate your icy pole.

TIP

If you don’t want a normal icy pole shape, you could trace a glass to create a circular shape. Or for something different, why not make it the shape of your favourite fruit!

Step 3

Use the Glu Stik to stick these onto the main icy pole. The clean side (no pencil marks) of you main icy pole should be facing up. Apply some Clag Kids PVA to half of the icy pole stick and glue the your icy pole design on top.

Step 4

Decorate with Glitter Glue and leave to dry. What a Masterpiece... and it won’t melt!

See all products