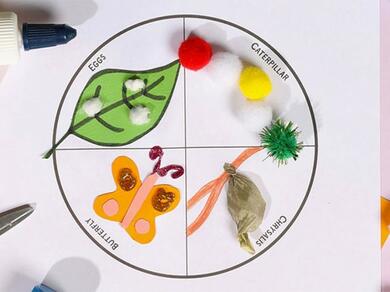
Butterfly plate life cycle

Bring nature’s transformation to your craft table with this hands-on DIY Butterfly Plate Life Cycle🦋 project, beautifully blending science with art! Begin by printing or drawing the plate template and cutting out a vibrant leaf using green paper. Use Bostik Hobby Craft Glue to attach tiny cotton "eggs" onto the leaf, then create the caterpillar stage with colourful pom-poms glued in a squiggly line. Add a tissue paper cocoon secured with Hobby Craft Glue, and finish with a stunning butterfly shape decorated using Bostik Glitter Glue and antenna’e for flair. This colourful, tactile activity helps children learn about metamorphosis step by step, perfect for classroom lessons, home projects, or as an educational display. 🍃

Instructions

Step 1: Ready template

Print out the life cycle template from the attached PDF… or draw your own!

Step 2: Make a leaf

Cut out a small leaf from your green construction paper and draw lines with a black pen.

Step 3: Stage 1

Tear a cotton ball into smaller sections and stick on the leaf to create eggs. Glue your creation onto STAGE 1 of the template.

Step 4: Stage 2

Glue colourful pom poms in a squiggly line on the STAGE 2 section to create your caterpillar.

Step 5: Create branch

Draw a small twig onto the STAGE 3 section.

Step 6: Stage 3

Cut a 3cm square of tissue paper and twist it at both ends to form the cocoon. Glue onto the twig.

Step 7: Stage 4

Cut out butterfly shape and paste onto STAGE 4 of your template.

Step 8: Create butterfly

Decorate with glitter glue and create the antennae.

See all products