How to make a Christmas wreath at home
Are you feeling festive? There's nothing better to get you in the Christmas spirit than putting baubles on your tree, wrapping a garland round your stairs, or hanging up your Christmas wreath. This year, why not choose to make your own wreath with festive foliage collected from your winter walks and get the whole family involved!
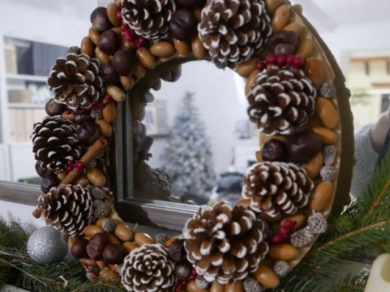
Our step-by-step guide reuses old cardboard boxes that are in abundance during the festive period to create a homemade Christmas wreath that can sit pretty on your front door, cabinets, or fireplace. Discover how to create your own wreath in just 4 simple steps.
What you will need
- Cardboard
- Festive foliage including pinecones, acorns, dried red berries, dried oranges, cinnamon sticks and more
- String or twine
- Scissors
- Pencil
Instructions
Disclaimer
We have launched a new and improved version of Fix & Flash. Please note this guide was created using the previous model but is still suitable for the new version. Browse the new Fix & Flash today.
Step 1: Cut the cardboard
To make your own Christmas wreath, start by using a pencil to sketch a large circle on your cardboard. Then, approximately 5-10cm inside your first circle, sketch a second circle so it sits parallel with the first. This will be the basis of your garland.
Note, the further your two circles are apart, the wider your garland will be, meaning more space for festive embellishments.
Once you're happy with the shape of your garland, carefully cut the outer circle from the cardboard and then cut and remove the inner circle.
Step 2: Arrange the embellishments
Once your DIY cardboard wreath has been cut, place your festive foliage and embellishments onto the wreath in your chosen design.
We recommend placing all items before sticking them in place to make sure you're happy with the design - arrange and rearrange as you feel best!
In need of some wreath decorating ideas? Stick pinecones evenly across the entire wreath as your focus. Then, using acorns and faux berries, fill in the gaps in between the pinecones. You can also use red ribbons, faux snow, and glitter for a hint of sparkle!
Step 3: Glue the items in place
Once you're happy with the design of your DIY Christmas wreath, it's time to stick your decorations in place.
Lift each item and place of blob of Fix & Flash onto the cardboard. Press the item into the glue for 5 seconds to create an initial tack.
Step 4: Shine the light to activate
Once you've created the initial tack, shine the light to set the glue in place and create a strong, long-lasting bond.
Repeat step 2 and 3 for all items until everything is secured.
Tip
Fix & Flash will dry in approximately 15 seconds, though this can vary depending on natural UV levels in the room and thickness of the blob of glue applied. Full cure is achieved between 17 and 24 hours.
You've made a DIY Christmas wreath
You're done! You have learnt how to make a Christmas wreath and it's ready to be the star of your show on the top of your fireplace, a side table, bookshelf, or door.
Show us your creations on Facebook and Instagram using the hashtag #CraftWithBostik.
Alternatively, take a look at our other festive crafts including how to make your own advent calendar, DIY Christmas napkin holders or our top sustainable gift wrapping techniques for the gift-giving season!
Please note
To prolong the life of your homemade Christmas wreath, we recommend keeping it indoors only in dry spaces.
Bostik Fix & Flash

