Easter cup bunnies

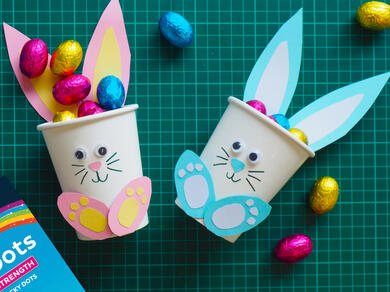
Hop into Easter creativity with this adorable DIY Easter Cup Bunnies🐰🌷 craft! Use coloured cardboard to cut out bunny ears, feet, and noses. Assemble with Bostik Glue Stick for the limbs and Glu Dots for the eyes and facial details, mess-free and fun. Draw on whiskers with a black pen and fill the bunny cups with Easter treats or decorative goodies. Quick, festive, and perfect for engaging kids in seasonal crafting, these cute cup bunnies bring holiday charm to any table or play space. ✂️
Instructions

STEP 1: Prepare your bunnies

Using the coloured cardboard, cut out the shapes for the bunny ears, feet and nose:

  • Bunny feet: 2 x Big oval shapes, 2x smaller oval shapes and 6x small circles for the toes.
  • Bunny ears: 2 x Large pointy ear shapes and 2x smaller pointy ear shapes (smaller shape should fit inside the bigger shape).
  • Bunny nose: A small oval for the nose.

Double the above numbers if you would like to make two cup bunnies like we have.

STEP 2: Make the ears and feet

Using Bostik Glue Stick, make the feet by gluing the small oval shapes into the center of the large oval shapes, then attaching the smaller circles for the toes.

Build the ears by sticking the smaller pointy ear shapes into the larger point ear shapes.

STEP 3: Add the eyes and nose

Using Bostik Glu Dots, stick the eyes onto the paper cup and then use Glue Stick to stick on the nose under the eyes.

STEP 4: Add the face

Using the black pen, draw the face onto the paper cup – don’t forget the whiskers!

STEP 5: Attach the ears and feet

Using Bostik Glu Dots, attach the ears and feet onto the paper cup.

STEP 6: Fill up your cup!

Finally (and most importantly) fill your Bunny Cup with Easter eggs!

See all products